dinsdag 5 mei 2015

Blog 12: RAW vs JPEG

Blog 12: RAW vs JPEG

RAW and JPEG. Every photographer will have to deal with these file types at some point. But what do they mean, and how do they differ? In this blog, I want to tell you about JPEG and RAW and which one to use when.

RAW en JPEG
The very moment a digital camera takes a photograph, all kinds of processes are activated inside the camera. Every digital camera has a processor (much like those found in computers) that processes your photograph before putting it out on your screen. JPEG files get a lot of processing done by the camera, while RAW files do not. Figure 1 depicts this.  

Figure 1: Sensordata to JPEG or RAW
As can be seen in figure 1, there are quite a few processes between sensor data and the JPEG image file output. The more serious photographers and enthusiastics alike want to manually control these processes in the post process workflow. The problem with JPEG is that you can’t. Settings like saturation, contrast, white balance, noise reduction etc. are all stored and locked inside the JPEG image file. To make matter worse, the image quality of JPEG files is reduced by compression, to minimize file size. The camera uses the build in photo editing software to do this. This software can be tweaked in the camera menu, as shown in figure 2 and 3.  
Figure 2: In-camera settings for JPEG files

Figure 3


 The settings used for JPEG compression are often stored in so called picture styles (figure 3). These picture styles have preprogrammed settings that can be used for several situations. For example, the portrait style will focus on sharpness, the landscape style even more so. These settings can of course be changed to suit your preferences. The monochrome style will make all you JPEG files black and white. As said before, these settings cannot be changed afterwards. A black and white JPEG will always remain black and white.

The RAW file is the complete opposite of the JPEG file format. As can be seen in figure 1, RAW files do not receive any processing in-camera whatsoever. The picture styles have no influence on the RAW file whatsoever. The RAW file only contains raw sensor data. Because the file does not get any processing done, it might look less good then the JPEG when viewed on a computer screen. Why then, would we want to use RAW instead of JPEG? Because a RAW file, containing loads more information than the JPEG, allows us to post process the images in specialized software such as Adobe Photoshop. 

With a RAW file, it is possible to alter white balance, saturation, contrast, noise reduction and many more settings after the photograph has been taken. To illustrate this, I want to use an example of a wedding I shot a few weeks ago. Figure 4 depicts what happens when you open a JPEG file in a program like Photoshop.

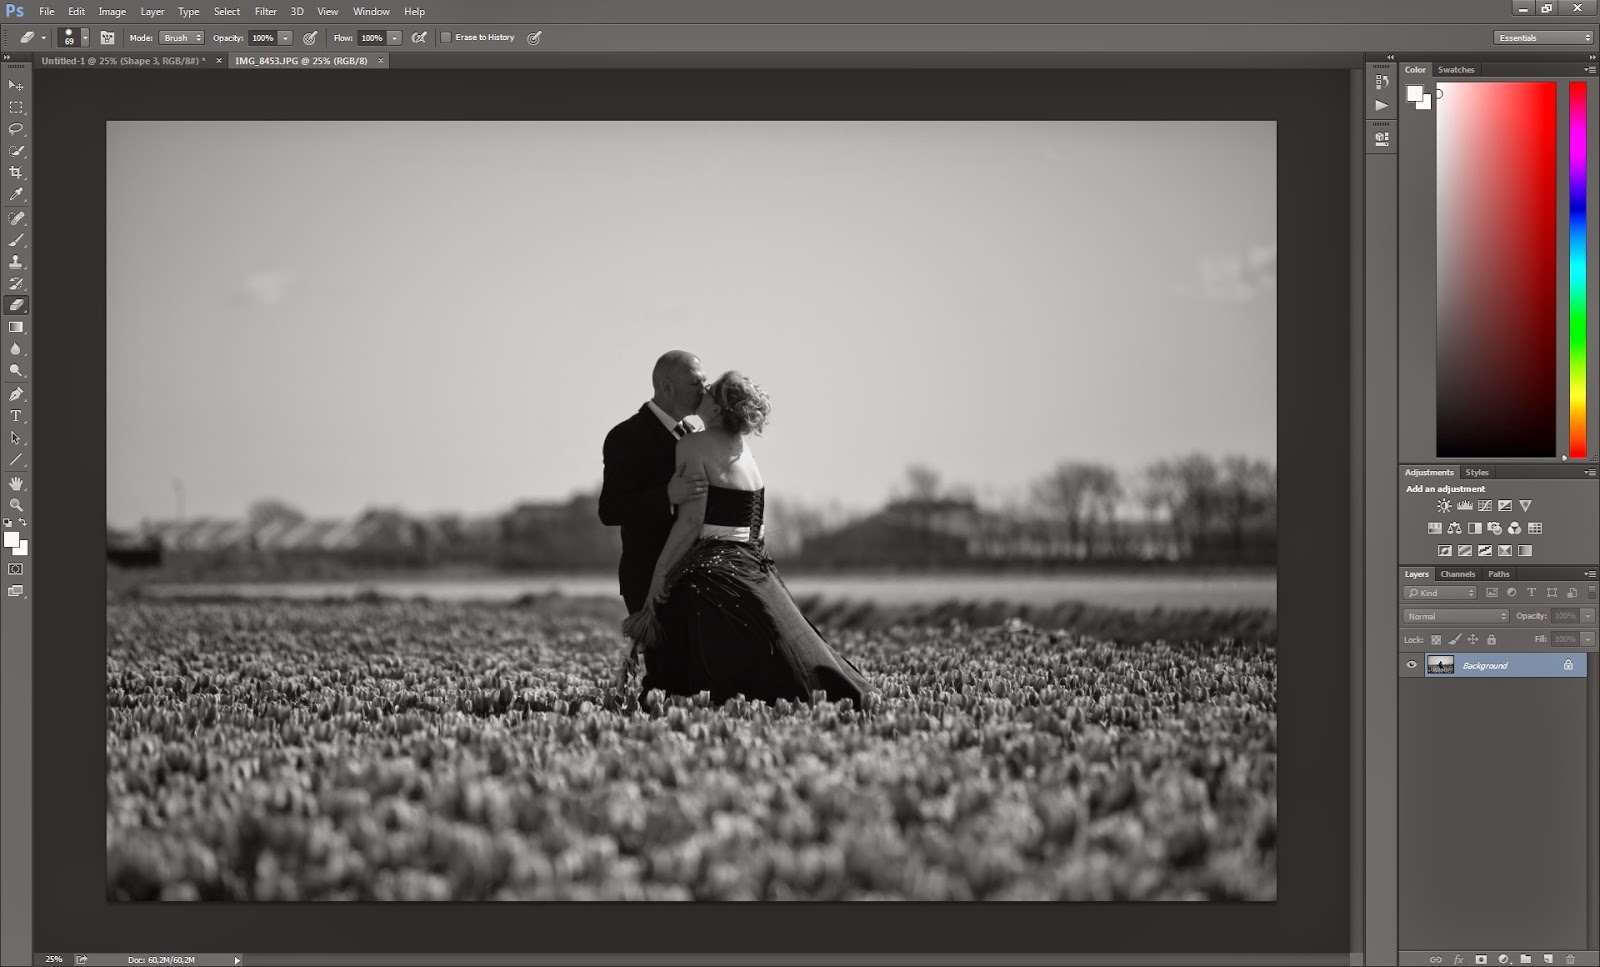
Figure 4: JPEG opened in Photoshop CC

As can be seen in figure 4, Photoshop will give me no options whatsoever to alter the settings of my photograph before turning it into an image file. When I made this photograph, I had my camera set to the monochrome picture style, because the bride to be asked me to shoot the make-up and hair session in black and white. Luckily for me, I had my camera set to RAW+JPEG (makes the camera record both).
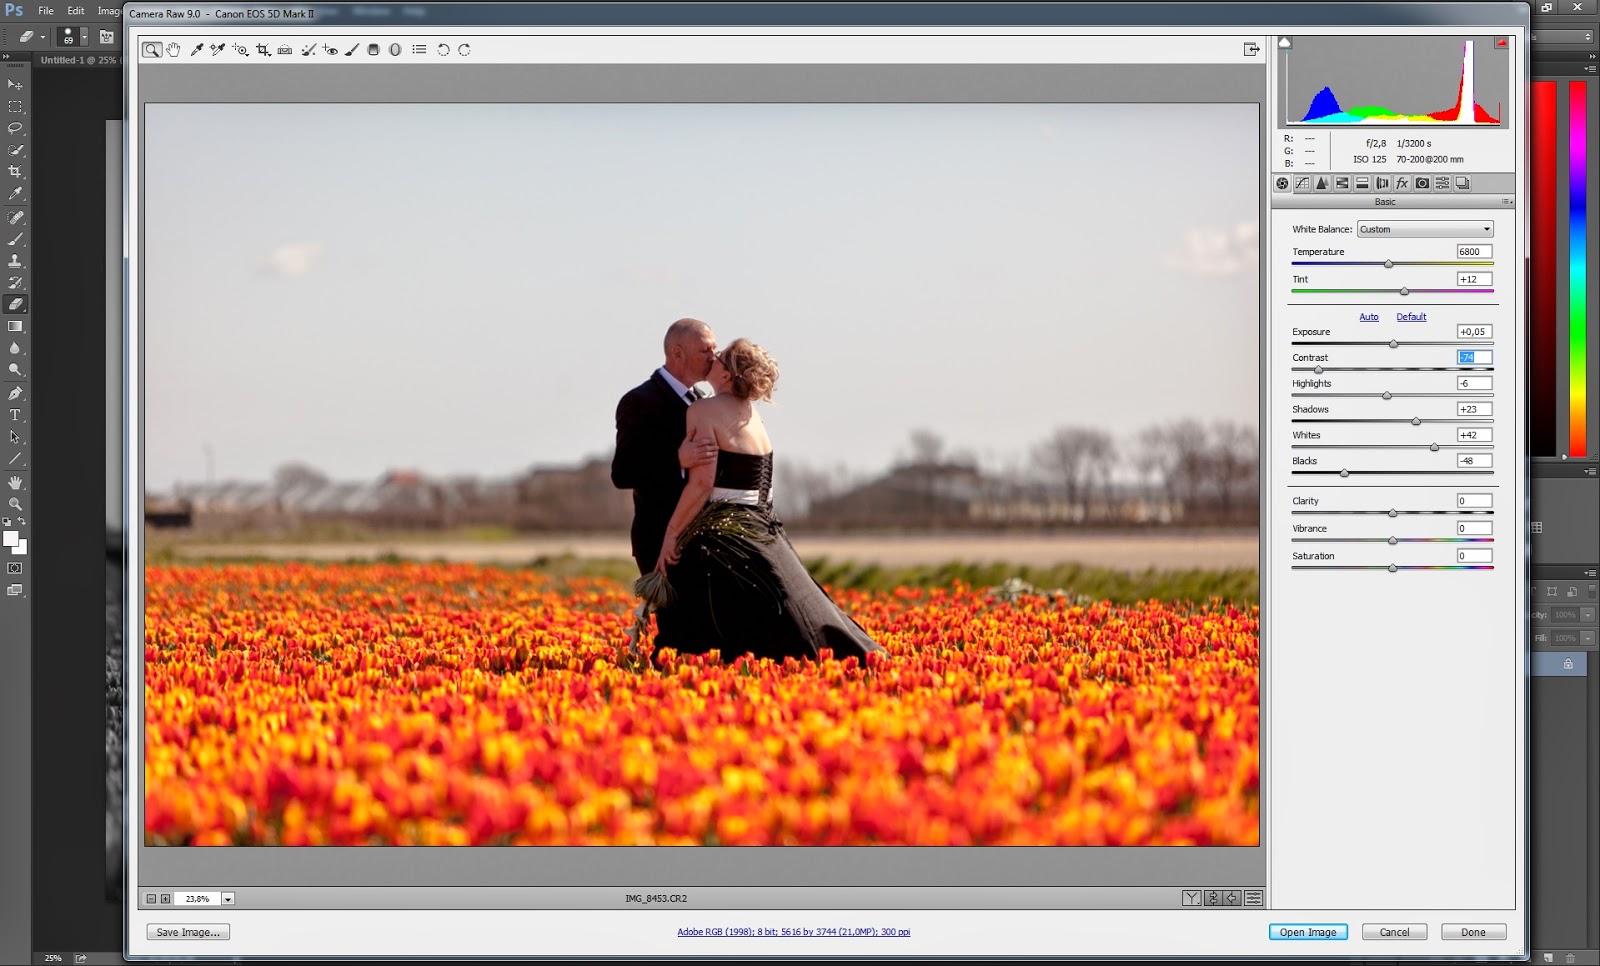
Figure 5: Same photograph, RAW file

Figure 5 depicts the same photograph, but this time I have opened the RAW file instead of the JPEG.
As can be seen in figure 5, all settings (including black and white), that were locked inside the JPEG, are available for post processing before the data is made into an image file. The sliders on the right side of the photograph visualize settings like white balance, saturation etc. Because of this, I can manually alter these settings, giving me more control over what happens to my photograph!

File size and workflow
The fact that a RAW file contains more data than a JPEG, can also be seen when comparing file size. A JPEG from a 20 MP camera will approximately be 10 MB. A RAW file of the same camera will amount to about 25MB. This means that your memory card will be able to contain less photographs when shooting in RAW. This doubles if you set your camera to RAW+JPEG.

The big question that hunts photographers around the world is this: Do I use RAW or JPEG? Most photographers curse the use of JPEG, because of the loss of control (little control freaks, the lot of us). Still, it can be wise to use JPEG instead of RAW, mainly if you are, for example, in a hurry to post photographs online (think sport events). A great advantage of JPEG is that 99% of the devices we use in daily life (like laptops, smartphones and tablets), are able to open and show JPEG files. If you want to use RAW files, you need a fast computer and special software. Also, because of the file size, it is far easier to share JPEG files then it is to share RAW files. I think it is impossible to answer the question of whether you should use JPEG or RAW. The bottom line, in my opinion, is this:  are you going to edit your photographs using special software and do you not want to carry around extra memory cards? If the answer is no, or if you are in a hurry, use JPEG. If you want the extra control in post processing and want to get the maximum out of your photographs, use RAW.


Or do what I do! I set my camera to RAW+JPEG S, letting my camera record both the RAW file and a low quality JPEG (can be seen in figure 6) and just carry around a few extra memory cards.


Figure 6: RAW+JPEG (low quality)

This way, selecting photographs will be a lot easier and no data can ever be lost. I use the low quality JPEGs to search for editable photographs that I find worthy of putting some time in. It is faster to scroll through JPEG files of 2 MB than to open all the RAW files (25MB a piece). If I find a photograph that is good enough to edit, I open the RAW file and use Photoshop to post process my image.

That is all for this blog! I hope you have all learned something from this post. There are more blog posts on my website http://photojitsu.nl/blogpost.html.  To follow me and my work, you can “like” my Facebook page www.facebook.com/photojitsu or follow me on Twitter @photojitsu_nl .
Until next time!


vrijdag 27 februari 2015

Blog 11: What are megapixels and why should I care?

The past decade, all camera manufacturers have been waging what we photographers call a “megapixel war”. One week, a brand would release a 10 megapixel camera, the next week a competitor would release a camera with 15 megapixels. The term “megapixel”, also revered to as MP, has become somewhat of an sales pitch in itself. But what is a megapixel and why should you care? Is more megapixels always better? What are the pros and cons of having more megapixels? In this blog, I will try to answer these questions.

What are megapixels?

A pixel is a light sensitive cell that resides on a sensor (figure 1). The amount of MP is a term for the amount of pixels on a sensor. If a sensor contains one MP, it holds 1.000.000 pixels! That means that a sensor with 10 MP holds 10 million pixels. 


Figure 1: coloured pixels on a sensor

The amount of pixels on a digital sensor is comparable to the resolution of a computer screen. Nowadays, a resolution of 1280x1024  or higher is most common. This means that the computer screen has 1280 pixels aligned horizontally and 1024 pixels vertically. This amounts to approximately 1.3 megapixels. Digital sensors now have a much higher resolution than that. For instance, a 20 MP sensor has a resolution of 5184x3456. This means that it contains 5184 pixels horizontally and 3456 pixels vertically and a grand total of 20.000.000 pixels! But what are the advantages of having that many pixels on a sensor? Don’t “they” always say that the amount of MP on the sensor don’t matter? Let’s see if that is true.


Advantages of high MP camera’s

There are two major advantages when it comes to having a lot of MP. The first, and foremost, is the fact that a high amount of  megapixels means more data being collected. This results in more details in the photograph. Figure 2 depicts this. Keep in mind that every block is one megapixel, thus contains 1.000.000 pixels.


Figure 2: amount of pixels on a sensor. More pixels means more details captured.

This effect is most obvious when taking photographs of a scene with a lot of small details. For instance, grass in a landscape or cloth during a portrait shoot. When you look at figure 3, which is the same as figure 2 but with added grass, you will see what I mean by this. The 8 MP sensor has just 2 vertical MP to capture the entire height of the grass, while the 48 MP sensor has 6. This simply means that the 48 MP sensor will capture 3 times as much details in the vertical axis than the 8 MP. In photography, this is often called  “resolving power”. In other words: will you see very blade of grass as an individual object, or does it become a green blur?


Figuur 3: More datapoints (pixels) means more details

The second great advantage has to do with printing. More megapixels will allow you to print your work on bigger formats without the loss of quality. Of course, you don’t need 20 MP to print photographs of 10x15cm. However, if you want to print a poster of let’s say 160x240 cm, you will need all the pixels you can get. This all has to do with something we call PPI, or Pixels Per Inch. The higher the PPI, the sharper the prints will be.

Now, a rule of thumb, depending on who you ask, is that the minimum PPI must always be 150. Using this fact we can set up a formula to calculate the maximum enlargement of the digital photograph.

The formula reads:


This means, for a photograph with a 10 MP resolution (3648x2736 pixels), that the maximum enlargement is 3648/150 = 24,32 inch, approximately 60 cm in length. The maximum width then is 2736/150 = 18 inch, approximately 45cm. So the maximum magnification of a 10MP photograph is approximately 60x45cm. If you want to print larger than that, you will have to lower the PPI and thus get a less sharp image. It is kind of hard to find a digital camera with less than 18 megapixels nowadays so, if your are not planning on making prints bigger than 60x45 cm, you don’t really need to worry about high megapixel count. However, if you are planning on making billboards, wallpaper, life size posters of yourself (or a foxy model), you might want to consider getting a camera with more megapixels. For comparison, here is the same size photograph, the left one is 300 PPI, the right one 50 PPI.


Figure 4: PPI comparison

Disadvantages to high megapixel count

Of course, as with everything, there are some disadvantages when it comes to having a lot of megapixels on your sensor. Perhaps the biggest con is that of image noise. Image noise is created by pixels that start “leaking” light on the neighbouring pixels because they are full. This is comparable to an ice cube tray. If you have 8 (or 12 as in this example) slots in this tray, you can fit in a decent amount of water in them before the slots start leaking into others.

Figure 5: more pixels on the same surface means smaller pixels

However, change the amount of slots to 48, as in figure 2, but keep the sensor size the same, and the pixels will have to be much smaller. Smaller pixels leak light faster, thus creating more image noise. If you raise the ISO on you camera, the pixels will be more sensitive to light and thus be “full” quicker.


Figure 6: image noise at high ISO settings

Of course this is not a problem when shooting landscapes. That is, if you brought a tripod as all landscape photographers should, or if you shoot in a studio where you can cater the light to your needs. It will become a problem for a street- or wedding photographer that have to up their ISO values indoors or during dusk, to keep a fast shutter speed. So the amount of megapixels that are useful to you, depends on what you want to do. High megapixel cameras are more suited for landscape and studio photographers, while lower MP cameras (creating less noise) are more suited for street-, wildlife- and wedding photographers.

A second disadvantage of a high megapixel count is that lens flaws become more obvious. All lenses contain minor flaws that cause aberration( figure 7), deforming, vignetting etc.


Figure 7: lens flaw: chromatic aberration

Lenses that use fluorite glass have less problems with lens flaws but are more expensive. It is safe to say that all flaws in a lens subtract from overall image quality. Therefore, if you want to use a camera with a high megapixel count, you should also buy adequate lenses (read: the more expensive ones).
That being said, I sometimes see people buy a very expensive camera body. Because the body is so expensive, they don’t have enough money for proper glass, so they buy a cheap lens with it. This is a very common mistake. The cheap lens will not make the most out of the resolution your expensive body will offer. Instead, do the opposite. Buy a more expensive lens with a less expensive body and your photographs will contain more detail, more contrast and more colour! Of course, if you want the best, go for a high megapixel camera (if you shoot studio or landscape) AND get an expensive lens.

One last disadvantage of a high MP count is the file size. A RAW file made with a 20 MP camera is approximately 25 MB. If you have a 40 MP camera, it will quickly shoot up to about 50MB per photograph. This means you need bigger memory cards, a faster PC and more hard drive space. Also, because of the higher resolution, you have to spent more time processing the images because you will see every little flaw in that models skin, every crooked hair, every speck of dust..

So, In summary:
-         - The amount of megapixels that is USEFUL for you, depends on what you want to shoot
-         -  High MP count means more details In your photographs
-         - High MP count means bigger enlargement without loss of quality
-         - Less MP means less image noise at higher ISO values
-         - Less MP means less bothersome lens flaws
-         - More expensive lens on a cheaper body is better than the other way around

So much for his blog! I hope that you have once again learned something useful. Check out  http://photojitsu.nl/blogpost.html for more blogposts and useful stuff to read about photography. In addition, if you want to follow me and my work, or just want to drop in to say hello, check out my facebook page www.facebook.com/photojitsu or twitter @photojitsu_nl.


Until next time!

woensdag 7 januari 2015

Blog 10 Travel photography: Equipment and tips

Travel photography – equipment and tips
It is finally happening. After months of saving, planning and searching you have decided to travel to Asia for 4 weeks. Because photography is your biggest hobby, you want to make sure you take the best pictures possible and that you visit all the great sites a country has to offer. After you finished packing your suitcase, it is time to charge your batteries, clean your lenses and pack your camera bag. That’s when you ask yourself: what do I take with me? Or maybe even more important: What do I leave behind?

My girlfriend and me just came back from a four week trip to Asia. Our trip started in Cambodia (Siem Reap), then we travelled to Laos (Luang Prabang) and our trip ended in Vietnam, where we visited Sapa and Halong Bay. In this blog, I would like to share with you my experiences of this trip in regards to what equipment to take and how to take home the above average photographs that we all so desire. I will start with the equipment that I carried with me.

Equipment
The first thing you have to make sure is that you are carrying a comfortable and reliable camera bag. I myself have a Click Elite Pro Express. This bag has a “lock” systems for the zippers, that clamps your zipper to your bag. If anybody tries to open your bag, he will swing it left and right and you will notice. So no sneaky lens stealing! To protect your equipment during changing weather, it is also advised to have a bag with a build in rain sleeve, or to carry one separately. The following equipment I took with me on my trip:

-          Canon EOS 5D Mark II with battery grip
-          Canon EF 135mm F2.0 L USM
-          Canon EF 24-105 F4.0 L USM
-          Sigma 35mm F1.4 Art DG HSM
-          Cleaning gear (lenspen, bellows, microfiber cloth)
-          3 CF cards of 8 gb (16gb in the camera)
-          Redged TSC-424 Ultimate Travel Tripod Carbon Gold Edition

Since this camera bag was my hand luggage, it had to stay under 7 kilograms. Sadly it didn’t, so I had to put the tripod in my suitcase. Don’t forget to weigh before you check in at the airport! To save some weight, your can of course take one lens that covers a large range i.e. 18-200. This however, has a negative effect on image quality, as can be read here.

It is always wise to take a standard zoom lens with you. This lens will stay on your body for 90% of the time. The other two lenses I carried are fast. This comes in handy when you want to shoot some photographs at night and don’t want to up your ISO too much or if you want to work with shallow depth of field (DoF).

During the day I carried my Canon EF 24-105 F4 L with me. This lens allowed me to shoot landscapes (24mm) and portraits (105mm) and still maintain good image quality. The only time I brought my 135mm during the day was when I was absolutely sure that I was going to shoot portraits. I could’ve done this with my 24-105, but I prefer the 135mm for portraits. In fact, the 135mm is my favourite portrait lens! I did not take my tripod during the day because I did not need it.

Figure 1: Canon 24-105 op 100mm F8 Luang Prabang, Laos

Figure 2: Canon 24-105 op 24mm  F8  Sapa, Vietnam

In the evenings, I left my standard lens in my hotel and put the 35mm prime on my camera. The 135mm I took with me as well. Because these lenses are “fast”, it will enable the user to shoot some handheld photographs during low light without raising the ISO too much.

Figure 3: Sigma 35mm nightmarket in Siem Reap, Cambodia

Figure 4: Canon 135mm old woman op de night market. Luang Prabang, Laos

How do I bring  good photographs back home?
If you are going on a trip if this magnitude (any trip really), you want to take home the best photographs possible. What makes this hard is that your can mostly visit every site only once. Often, there is no chance to visit the same place twice, especially in the middle of the jungle, to retake a photograph. Add to this the fact that, especially during group travels, you often don’t get to choose where you will be on what time of day, so you cannot wait for the perfect light. Luckily, there are some things you can do in preparation, to make sure you have the best chance at getting those beautiful photographs.

The tip I want to give: Make sure you know your camera by heart. I lost count of how many photographers I have seen, missing great moments, like the playing children on the cart, because they were fumbling around in the menus of their cameras. You don’t want to stand there twisting dials for ten minutes. Not only does this make you miss some moments, it might make you miss the entire scene if the guide or the other group members want to move on to the next spot. So before you go on a trip, find out how to change ISO value and what value is acceptable for you (or when your camera starts to produce too much noise). Find out how to change the aperture and at what aperture your lens gives the sharpest images etc.

Figure 5: playing children in Sapa, Vietnam

The second tip: prepare. Read information about the countries you are visiting. Google is your friend. The internet is full of blogs and stories like this one, make them work to your advantage. Preparation is of course finding out what country you go to, what language do they speak, what defines their culture. More importantly though, make sure your know where you are at what time of day and what kind of pictures you want to take (to match your equipment).

For example, for landscape photography you need beautiful light. This light is available during sunrise and sunset and approximately one hour before and after these events. However, you don’t get to choose where you are at that time, given you travel in a group and have a set schedule. So you should take this into account when preparing.

When you want to do landscape photography (example again), make sure you bring a polarising filter and a graduated filter. This somewhat helps preventing colour cast and blown out skies.

 
Figure 6: landscape photograph, middle of the day

If you want to shoot portraits (one jungle tour took us to some remote villages of the Hmong people), bring your portrait lens etc.

The people in Asia sometimes expect you to pay them for a photograph, or that you buy something off of them. Don’t be fooled by giving them large amounts of money, most people settle for about 20 dollar cents. The old lady in figure 7 insisted that we buy something from her which, given the quality of her posing skills, seemed very reasonable.
  
Figure 7: An old woman in a remote village in Sapa, Vietnam. Luckily I brought my portrait lens!

Don’t be afraid of taking loads of photographs. Bring enough memory cards and fill them if you have to. Normally I prefer quality over quantity but, because you can visit most sites only once, it is better to take 100 photographs too much then 1 too few! Be sure to get some knowledge of the subjects you want to shoot, this being portrait, landscapes, streets or whatever. This helps taking good photographs faster and more efficient.

The third and final tip: don’t forget to enjoy yourself! Of course it is very tempting to practice photography every single minute of the day. Maybe you feel ambitions hot breath in your neck, or perhaps you see the shining glory of a National Geographic Magazine cover photo, but the most important thing is that you experience and enjoy the surroundings and people. Don’t be afraid to lay down your camera once in a while, hang it around your neck or just leave it at the hotel. Photography is about observing and that doesn’t always have to be done looking through a lens.

I hope you enjoyed this blog as much as I had writing it. I had an amazing trip through Asia and, in my eyes, brought back some really good and special photographs. If you have any questions, or if you want to follow my work, you can find me at Facebook, Twitter or email.  See you next blog!

I added some more photographs of my fantastic trip!


 Figure 8 Sapa, Vietnam

Figure 9 Kuang Si waterfalls, Laos

Figure 10: swimming in paradise, Laos

Figure 11: Street image, Laos


Figure 12: boy with chicken
Figure 13: child of the Hmong


Figure 14: Children in Laos
Figure 15: Child with puppy


Blog 15: The Orton Effect

The Orton effect One of the questions I get asked very often is; how come some of your photographs have such a dreamy look to them? Well...