vrijdag 25 oktober 2013

Blog 7: Autumn photographing

7. Making Autumn photographs.

Hello and welcome back once again. In today’s blog I would like to cover the subject of colour change in your photograph. More specific, I would like to explain to you how you can make those autumn forests really look like autumn forests. But before I get to explaining the Photoshop tricks you will need, we will take a look at the situation.

I was born and raised in a town called Heiloo. Heiloo is a small town (approximately 22.000 people) in the Noord-Holland province of the Netherlands. As a kid, my parents often took me for a walk in the forest of Heiloo, conveniently called the Heilooër forest. This forest is hundreds of years old and got its name from back in the Germanic era when it was called “heiliger loo” which means Sacred Forest. I still love to go here. Not only for sentimental reasons but also because I think it is really beautiful there.

On to photography then. When I walk through the forest, I see all kinds of colours. I walk around with my camera and my tripod (not a lot of light in the forest because of all the trees you can find there J) and take photographs of lanes, hills (there is one, yay), people and benches. After a few hours I go home and sit behind my computer to look at the photo’s I have taken. My minds’ eye has given me all these memories of the past few hours, portraying golden forests with blood red leaves.


But when I open my photo it looks like this, and I am like: what? No, this can’t be right.. Green?! But it was all golden and red and magical!
Well sad truth is that what you perceive isn’t always what is actually there. A camera is really an honest object, it only captures what is there. So that is where Photoshop comes in handy.

Photoshop (or any other similar program I know nothing about) allows me to recreate what I have seen with my third eye from what was actually seen with my regular ones!

There is a (free) Photoshop manual on my website that explains in easy steps how to achieve this for any photo. You can find that here: http://photojitsu.nl/psguide.html.
In this blog I would like to concentrate on the picture on the left here, which is basically the same as any other photograph.
Ow well, moving on!


First we need to open the photograph in Photoshop and do the basic adjusting like local contrast and highlights. If you don’t know how to do this, please refer to the manual on my website.
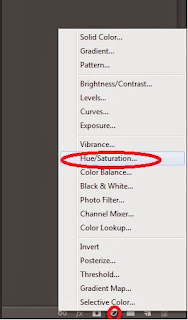
After you have opened the photograph and did the basic adjustments, it is time to alter the colours. To do so, select “new adjustment layer” and then click on “hue/saturation”.
Here you will see all kinds of sliders. First thing you want to change is the settings next to the little hand with two arrows. By default this says “master”. Changing hue in master mode will change the entire picture. What you really want to do is set it to a select colour. Now most of us (including me) would assume that the colours in this photograph are mostly “greens”. However, according to PS, most colours are in the “yellows” range. So first change this setting from “master” to “yellows”.


Use the slider “hue” to change the colour of all the yellows in this photograph. I prefer to make them an intense red colour.


 After you are satisfied with the “yellows”, switch the settings to “greens”. Now adjust the greens in such a manner that they appear as the colour you want, in my case a bright yellow. After you are done, just click anywhere in the photograph to exit the layer and return to the actual photo.

When done, the photo will look a little something like this. As you can see, it is lacking a bit in the contrast department. There are two things you can do here. The first is using a simple contrast/brightness layer (found under the same menu as the hue/saturation) and up the contrast of our photograph. However, there is a second technique I want to tell your about. This technique works very well for any photo that should have a nice magical glow to it. Handily, it also adds contrast to your photos.

To create this effect, I use something called the Orton effect. The Orton effect, or simply called Orton, is a technique in which you duplicate your base layer, add a Gaussian blur and then change the setting of that copy to “overlay”. This technique is also described in my Photoshop manual.


In short: press CTRL+J to duplicate your base layer. Go to filteràblurà Gaussian blur and apply a blur effect with a radius of approximately 40 pixels.


Press apply and set the blending option to “Overlay”.


You will notice that the photograph is way too dark and saturated. To adjust this, simply change the opacity until you find it suitable (in this case around 60%).


Your photograph should look something like this now. The colours are bright, contrast is high and it has a nice soft glow to it.

Basically we are done now, the colours and light are how I have seen this forest with my third eye. However, I felt like there was something missing.


I always like photographs like this to have some human reference in them so I decided to add just that.


I took a silhouette from a man I shot in another photograph and I added him to this one. Can you see him? The man that always walks through this forest. I have no idea who he is or what he is doing. He’s just always there, in the distance, walking..


And there you have it. I have changed a real photograph of the Heilooër forest into a photograph of the way I see the Heilooër forest.  If you have any questions regarding this blog, or one of the others (yeah, there is more! J) please feel free to contact me at info@photojitsu.nl. Like my work? Why not have a look at www.photojitsu.nl or www.facebook.com/photojitsu .


zondag 8 september 2013

Blog 6: Different lenses and their applications.


Different lenses, different applications.

Hello and welcome to my sixth blog entry. Today I would like to tell you something about different lenses and when to apply which type. Keep in mind that these are general applications. There is no one stopping you from using your lens in different fields.

Before we dive into the actual lens types, I want to tell you something about the science behind these lenses. Photography is writing with light (freely translated) and light is bound by natural laws. The most important part is the so called focal length. Light is reflected on an object and taken in by the lens on the camera. The image however, is always in reverse because of the glass that resides inside the lenses. The point where the light “crosses” is called the focal length. It is the length between that point and the sensor.


All lenses work according to this principle. In this example, a 24-105mm zoom lens was used. 


This picture shows a shorter focal length (24mm in this example).
 Because the focal length is closer to the sensor, the camera will capture “more” of the surroundings. This is what we call a wide angle lens. 


The zoom lens is able to shift the focal length from 24mm to, for example 105mm, capturing less of the surroundings and more of the object of interest. This is what we call zooming.


The amount of “zoom” is indicated on the lens. For this example, a 24-105mm zoom lens was used. This lens can vary between 24 and 105mm and everything in between, making it zoom approximately 4.5 times. Lenses that range from 18-200mm have 11x optical zoom. Keep in mind however, that lenses with a greater zoom range generally take less sharp photos (the reason why not everyone is running around with mega zoom lenses). 

Now that we have had a look at the basic physics of lenses, let’s move on to their application.

In general, there are four basic categories in which we can divide lenses. They are:

- Prime lenses

- Wide angle lenses

- Standard zoom lenses

- Tele/supertele lenses

All these types of lenses have their own general application. I will discuss each and every type in this blog. There are some other lenses on the market, like fisheye lenses, tilt-shift lenses and lenses with adjustable depth of field like Lensbaby. I will not discuss these lenses in this blog but might do so in the future.

Prime lenses

The first category is lenses with a fixed focal length. In normal language this means that the lens is not capable of zooming. 

In the photo on the left you can see one of these prime lenses, the Canon EF 50mm F1.4. The pros of these lenses are the unsurpassed image quality, speed and autofocus speed. Primes are usually fast, which means they have small F values (like the 1.4 on the photo). Smaller F values mean more light entering the lens and reaching the sensor. The actual application is determined by the focal length, depicted as the amount of mm on the lens. A 24 mm lens is mainly used in landscape or street photography. A 50mm lens is mostly seen as the standard lens (because our eyes operate at approximately 50mm). At 50mm your camera sees what you see, making it suitable for almost anything! The larger focal lengths, i.e. 85mm, 100mm etc are mostly used for portrait photography and macro photography. 
Needless to say, the biggest con of this lens is the inability to zoom. If you change application, you have to change the lens.


This photo was taken at night, without the use of a tripod, using the speed (F1.4) of the 50mm F1.4 prime, a 1/100s shutter speed at ISO 400. The depth of field and shutter speed would not have been possible without the speed of this lens. I love it!


Summary for prime lenses:

- Unsurpassed image quality, speed and autofocus speed

- Application is determined by focal length

- No zoom means changing lenses when switching objects

Wide angle lenses

Wide angle lenses have a short focal length. The wide angle lenses range from approximately 10 to 40mm. Because of the short focal length, the lens will capture more of the surroundings (as in the example). This makes wide angle lenses the preferred choice for landscape- and street photography.


For landscape photography, the speed of the lens is unimportant. Landscape photographers usually aim to capture the entire landscape in one sharp image. This means that a high F value is required (i.e. F22). For street photography, the speed is more important, especially when shooting indoors. Think train stations, subways, bars, restaurants, dense urban locations etc. Because of their nature, wide angle lenses tend to cause barrel distortion. Barrel distortion is where the outer corners of the image are bent, like a barrel. Be careful around butts and thighs, they will look bigger than they actually are!


This photo was taken using a 16-35mm lens at F8. Without the short focal length, I would never have been able to capture so much of the sea, since I was standing a few meters away from it! I used the F8 to make sure the beach and water were sharp.


Summary for wide angle lenses:

- Short focal length (approximately 10 to 35mm).

- Used in landscape, street and architecture photography.

- Speed is unimportant for landscape or architecture photography, but more so for street photography.

- Be careful with barrel distortion. People may look bigger than they are.


Standard zoom lenses

The next category is the so called standard zoom lenses. Standard zoom means the range between approximately 50mm and 105mm. The lenses that utilize the standard zoom range however, mostly also cover a part of the wide angle range. Therefore, these are the most versatile lenses one can own. 

For example, I own the Canon EF 24-105L F4 (see photo).

This lens allows me to capture landscapes (wide angle) and make portraits (standard zoom) and everything in between, while still maintaining great optical quality and autofocus speed. When using one of these lenses, you hardly have to take if off the body.

Standard zoom lenses like this one are best to take on a holiday when you don’t want to carry different lenses with you. Albeit not having the large zoom range of an 18-200 lens, the image quality is far superior. As for the speed, 18-200 lenses usually slow down considerably when zoomed in. For example, one of those lenses might be able to reach F3.5 on 18mm but slows down to F5.6 when zoomed above 120mm. This 24-105mm has F4 across the entire range. This is my most used lens!



This photo was taken on the NDSM wharf in Amsterdam. The 24mm allowed me to capture the entire sculpture.


This photo was taken using the same lens as the Amdock photo. Because of the 105mm, this lens is also suitable for portrait photography.


Summary for standard zoom lenses:

- Versatile lenses because of both wide angle and standard zoom ranges

- Most standard zoom lenses remain fast even when zooming

- Almost no changing of lenses because of wide application


Tele/supertele lenses
The last category is the tele/supertele lenses. These lenses are usually very long and range from approximately 120mm to 1700mm. The biggest supertele is a whopping 5200mm (it is really a prime)! 


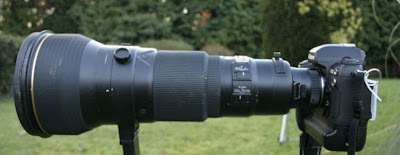
This photo shows a supertele lens on the body of a Nikon camera.
Tele and supertele lenses are mostly used for animal photography, sports photography and voyeurism.
Because of its large focal length, images lose depth and there is no real distinction between object and background. They do allow you to take that photo of a lion in Africa, or the winning goal of your favorite soccer player while standing on the sideline. 


This photo was taken using a 70-200mm lens on F4 during a visit of a zoo in Alphen aan de Rijn. The bird was pretty far away so I had to use the full 200mm to get a crop of its head. Because of the F4, the background got nice and blurry (we call this effect Bokeh).


Summary for tele/supertele lenses:

- Mostly large, expensive and heavy lenses

- Used in animal- and sports photography

- Allows you to “snipe” shy animals and winning goal scoring soccer players

Well this concludes my blog on different lenses and their application. Like I said in the intro, this blog describes general applications. Of course you can use a supertele for landscape photography, or a wide angle lens for portraits. You might get some surprising results!

If you have any questions, suggestions, complaints or compliments, please contact me at info@photojitsu.nl.

Also, come visit me at www.photojitsu.nl, www.facebook.com/photojitsu and follow me on Twitter @photojitsu_nl.

Thanks for reading!
Maarten Kuiper
owner of Photojitsu.nl

maandag 5 augustus 2013

Blog 5: Landscape photography

Blog 5: Tips and tricks for landscape photography.

Hello again, and welcome to our fifth blog entry. This time I would like to shed some light on challenges you might encounter when practicing landscape photography. Landscape photography might seem like an easy practice. The landscape is there, it doesn’t move, it isn’t on a tight schedule and you can take all the time in the world to set up your camera for that perfect shot. You press the shutter and *click* the scenery doesn’t look anything like its real counterpart. So what is it that makes landscape photography so difficult?

3D vs 2D vs depth

First of all, always remember that the world is built in 3D (x, y and z axis) and your photo is a 2D reconstruction of that world (only x and y axis).


Picture 1: 3D vs 2D

A mountain might seem incredibly vast and intimidating in real life, but make a picture of it and it seems flat. That is because there is no z axis! In order to create a sense of distance in our photos, and to bring back a visual rendition of the z-axis, it is really important to not only focus on the background, but on the foreground as well.

In this example (photo 1), the photographer took a small part of the beach and some rocks as a reference point for viewers. This creates a virtual z-axis for the viewer. You get a sense of depth in the photo.


Photo 1: foreground in landscape photography.

Now if you place your fingers over the big rocks (do it!) and look at the right side of the photo, you will lose the z axis and with that the sense of depth.

Photo 2 is a good example of another problem with landscape photography.


Photo 2: angle of the photo is important

In this photo, I have created a sense of depth by adding something in the foreground. However, the viewer has no idea how high that waterfall is (and it was pretty high). The problem with this photo is its angle. This photo was taken high off the ground. If you want to express the vastness of something, you can do two things. First, you can shift the angle and lower your camera. This works well for any photo. However, it is not always possible to reach the ground (as in this example).

 The second thing you can do to improve the sense of vastness is to add an object as a reference point, preferably one that is common to most people (like more people!). Photo 3 is a good example.


Photo 3: better angle, still no reference point


This is the same lake as in Photo 1, only taken at a different time of day and from a different angle. You get a better view of the lake and how vast it is. The dark line at the right side of the photo creates our Z axis. However, you still don’t get a sense of the vastness of the mountains (because of the high angle).

 To do this, I have waited for some reference points to appear. In this case, humans.


 Photo 4: Better angle and a reference point.

Photo 4 is the same as photo 3, only this time I have not edited out the reference points for our viewers. There is a man on the lake, standing on a boat, rowing towards the right. This immediately creates a sense of vastness because everybody knows the real size of a human being (well on average anyway).
  
There are two more subjects I want to discuss in this blog. The first one is the horizon. There is nothing more destructive for a landscape photo then a sloping horizon. Take some time to adjust your camera correctly. There are all sorts of handy accessories to ease this process. If, by chance, you happen to have a sloping horizon, despite all your efforts to prevent it, straighten it out using software. There is a photoshop manual on my website that tells you how to in a few easy steps (http://photojitsu.nl/psguide.html).

The last subject is the time of day. The light of the sun follows a distinctive patern during the day, use it! When the sun comes up, there is what photographers call “the blue hour”. It is one hour from the first rays of light. You can still see that it is night, the world will be dark, but the sky will light up nicely in your photos. After the blue hour comes the golden hour. It is the time of day where your subject basks in warm light. After the golden hour, the light becomes more bright and white, reaching its peak around 13:00 hours. Then the sun starts to set again. During sunset you first get the golden hour and after that another blue hour. It is best to practice landscape photography during the blue or golden hour! Remember this cycle:


Ofcourse it changes when you are in a forest or if it is cloudy.

Short summary:

- keep the horizon straight
- photograph when the light allows it
- check not only background but foreground as well
- check angles and axis


Well this was my fifth blog entry. I hope you enjoyed it and learned something from it. If you have any questions, please ask me (info@photojitsu.nl). For more photo’s and blogs you can check www.photojitsu.nl. I am also on facebook and twitter (see website for links) if you want to follow my work or this blog.

Thank you!


zaterdag 3 augustus 2013

Blog 4: HDR and selective colour

Blog 4: HDR en selective colour.

So here it is. My first blog post in English.
I get a lot of questions about my photographs. The most questions are about my HDR/Selective colour photos. In this blog post, I will explain how you make them.

HDR

HDR is an abbreviation for High Dynamic Range. It basically consists of at least three photo’s (five or seven is more common) that are placed on top of each other. The first photo is underexposed, the second photo has a normal exposure and the last one is overexposed (photo 1, 2 and 3 respectively).


These three photos are then processed using special software (Photoshop has a build in HDR script, see the photoshop manual on the website).  The light parts of the photo are taken from the underexposed photo because they hold the most detail. The dark parts of the photo (i.e. the shadows) are taken from the overexposed photo, again because they hold the most details. The rest of the photo is taken from the normal exposed photo. The result is photo 4.

 Photo 4:  High Dynamic Range photo.

Selective colour:
Now that we have our HDR photo, it is time to add the selective colour. Selective colour is the term that is used to describe two types of photos. The first is a photo/film in which only 1 colour is present (remember Schindlers List or more recently Sin City). It can also be used to describe a photo or a film in which certain parts are in colour, like in this photograph.

Using photoshop, we apply a black and white layer to the HDR photo.
Right, lets have a look at our photoshop screen (photo 5).


Press that little round icon, and select black and white. Ignore all the sliders that pop up.

Now just go to your brush, make sure the frontcolour is set to Black and use the brush to “paint” the parts of the photo that you want to have in colour (photo 6).


This technique is also more thoroughly described in my photoshop manual that you can find on the website.
Easy as that! I will close this blog with four examples of my own HDR/Selective colour photos. Hope you enjoy them!

If you read this blog and/or if you are going to use my photoshop manual make sure you drop me a line in my guestbook!

Why not join us on Facebook? www.facebook.com/photojistu .


Blog 3: Van de geijkte paden af

Blog 3: Van de geijkte paden af

Professionals vertellen dat fotografie altijd gepaard gaat met zorgvuldig plannen, locaties scouten, rekening houden met het weer, het licht, de temperatuur etc. Ik wil jullie graag vertellen dat dat niet altijd nodig is.

Via internet zijn er talloze sites te vinden die fotografische locaties beschrijven, vaak met voorbeeldfoto’s en routes, waar u heen kunt gaan. Het voordeel is dat je zo langs alle bezienswaardigheden en mooie plekjes komt. Het nadeel is echter dat er vele voor jou zijn geweest die deze locaties bezocht en gefotografeerd hebben. Dit doet natuurlijk niet af aan het feit dat vaak gefotografeerde onderwerpen ook nog origineel in beeld kunnen worden gebracht.

Ik kan iedereen van harte aanraden om eens de avontuurlijke schoenen aan te trekken en op pad te gaan in een omgeving waar u nog nooit eerder geweest bent, of delen van locaties te bezoeken die in eerste instantie niet zo fotogeniek lijken. Veel fotos heb ik genomen op plekken waar ik normaliter niet zou komen. De reden dat ik deze locaties “gevonden” heb komt enkel en alleen doordat ik het heerlijk vind om naar bijvoorbeeld Amsterdam te gaan, daar een metro- of tramstation te selecteren als startpunt, om vervolgens rond te gaan zwerven. Weg van de geijkte paden, de al honderden gefotografeerde gebouwen en bruggen en de vaste route door het gebied.

Ik heb voor deze blog een tweetal fotos uitgekozen die locaties laten zien waar ik per toeval ben beland. Ik zal deze foto’s toelichten.

foto 1: Amsterdam op kerstavond

Amsterdam. Misschien wel de meest gefotografeerde stad van ons land. De Dam, Kalverstraat, het Paleis op de Dam, de magere brug, allemaal locaties die al duizende keren op de gevoelige plaat vast zijn gelegd. Ik heb een fotoboek van Jacob Olie waarin al deze locaties gefotografeerd staan. Deze foto’s komen uit een periode tussen 1860-1905. Toch zijn er, 152 jaar na dato, nog altijd schitterende plekken te vinden die nog niet zo vaak gefotografeerd zijn. Deze foto heb ik genomen toen ik met een van mijn studenten op fotodate was. Na een bezoek aan het Amsterdam Light Festival besloten we om nog wat rond te zwerven door de stad. Na een aantal, voor fotobegrippen, saaie straatjes zag ik opeens dit beeld. De straten waren verlaten, het was ijskoud. Het enige warme licht kwam uit de huizen en de schijnwerper die op de toren gericht stond. Om dit te accentueren heb ik gebruik gemaakt van selective colour.


foto 2: Heemskerk in de herfst

Drie huizen in de duinen van Heemskerk, nabij Gasterij De Kruisberg. Normaliter lopen mijn vriendin en ik rechtstreeks van de parkeerplaats aan het begin van het bos naar de Kruisberg. We besloten deze keer echter wat rond te lopen en te genieten van het herfstzonnetje met bijbehorende lucht en wind. Toen ik even rondkeek om de omgeving in me op te nemen zag ik bovenstaand beeld. Het licht was perfect, de kleuren waren mooi door de herfst en het contrast tussen wolken en grond was grandioos. Om alle facetten van het licht te vangen heb ik de foto in HDR geschoten. De bewerking heb ik gedaan in Nik HDR Efex Pro 2.

Hiermee komt mijn derde blog ten einde. Natuurlijk is het prettig om foto’s van te voren te plannen en routes uit te stippelen, maar soms heb je daar simpelweg gewoon geen tijd voor of zin in. Schroom niet en trek er gewoon op uit. Neem eens een afslag die je nog nooit genomen hebt, stap eens een halte eerder uit en ga op zoek naar plekken waar je nog nooit bent geweest.

Ik dank iedereen wederom voor jullie tijd en hoop dat jullie geinspireerd zijn geraakt door deze blog. Tot de volgende keer!


Heeft u vragen, suggesties of opmerkingen? Stuur dan een mail naar info@photojitsu.nl. Benieuwd naar meer van mijn foto’s? Kijk eens op www.facebook.com/photojitsu of www.photojitsu.nl.

Blog 2: Naar de shop of niet?


Blog 2: Naar de shop of niet?

Mijn tweede blog entry, zoals dat met een populair woord heet. Ik had aanvankelijk gekozen voor een ander onderwerp dan dit, maar ik merk dat het steeds vaker een discussiepunt vormt. 

Ik krijg vaak de vraag waarom ik mijn foto’s bewerk, of ik niet in staat ben om mooie foto’s te maken zonder Photoshop en of ik niet vind dat het bewerken van fotos afbreuk doet aan de realteit. Hier wil ik enige toelichting op geven. Voor diegenen die geen gebruik maken van Photoshop maar een ander programma, sorry, ik ken eigenlijk alleen het pakket van Adobe J. Laten we het voor het gemak dan maar even beeldbewerking noemen.

De tegenstanders van beeldbewerking roepen dat bewerkte foto’s niet echt lijken, dat het de realiteit verbloemt (of juist verduistert) en dat “goede” foto’s geen beeldbewerking nodig hebben. Voorstanders van beeldbewerking zeggen juist dat het uittreden uit de realiteit een doel op zich is en zeg nou eerlijk, niemand kijkt toch films zonder special effects?

Ten eerste is er de discussie waar beeldbewerking begint. Feit is dat de foto’s uit een digitale camera (ja ook die van u, eigenaar van een Canon 1D X / Nikon D4 of ander super-reflex van een andere fabrikant) altijd een tikkeltje onscherp en flets zijn. Vaak is daar met de software, die u van uw camerafabrikant heeft gekregen bij aanschaf van uw camera, wat aan te doen. Dit kan echter ook met o.a. Photoshop. Valt dit dan al onder het bewerken van uw foto’s? Of is dit geen bewerking maar herstellen? Als u kleur- en scherptecorrecties toe staat, waarom dan geen kleurverandering (foto 1).

Foto 1: de grote seizoensverandering. Copyright photojitsu.nl

Het verandert verder niets aan de compositie of onderwerpen in de foto, alleen de kleur verandert.
Begint beeldbewerking dan pas op het moment dat juist deze factoren gemanipuleerd worden? Hoe zit het dan met foto’s die opzettelijk in scène worden gezet, is dat dan ook beeldbewerking? Of is het beeldbewerking op het moment dat de realiteit verdraaid wordt? Als beelden mooier/enger/ dromeriger worden gemaakt dan dat ze in werkelijkheid zijn? En wat is dan beter, wel of niet bewerken? Ik denk dat het een discussie is die niemand kan winnen. Belangrijker is te kijken naar de toepassing van de foto.

Er zijn disciplines (sport- en rapportagefotografie bijvoorbeeld) waarbij het verboden is om de foto’s te bewerken. Zeker in de journalistieke wereld wordt er zoveel mogelijk gestreefd naar het zo waarheidsgetrouw en objectief overbrengen van de realiteit. In de journalistieke wereld is beeldbewerking dan ook een gevaarlijke tool die gebruikt kan worden in de manipulatie van de mening van een bevolking, zij het positief of negatief.

Een goed, maar ietwat zwaar voorbeeld, is onderstaande foto (foto 2). In deze foto is de uitsnede al een vorm van beeldbewerking, omdat de kijker een totaal ander beeld wordt voorgeschoteld.


De kijker, die de linker foto bekijkt, ziet een man die onder schot wordt gehouden, een aangrijpend beeld op een negatieve manier ( kijk wat de agressor doet met onze soldaten). De kijker, die de middelste foto ziet, ziet een oorlogssituatie waarin een soldaat van de vijand(waarschijnlijk) water wordt gegeven, terwijl hij onder schot wordt gehouden. Dit beeld heeft zowel negatieve als positieve invloed op de kijker. Het rechterbeeld toont alleen een soldaat die een gevangen vijand te drinken geeft. Dit is een aangrijpend beeld op een positieve manier (kijk onze soldaten zorgen voor de soldaten van de vijand). Onder censuur zal waarschijnlijk de verdediger de linker foto laten zien, de neutrale partij de middelste en de agressor de rechter. In deze vorm van fotografie is beeldbewerking naar mijn mening taboe omdat het de mening en het gevoel van de kijker direct beinvloedt.


Even een luchtiger voorbeeld. Naast de journalistieke fotografie bestaan er ook stromingen zoals surrealistische fotografie. In surrealistische fotografie, zoals de naam al zegt, wordt juist gestreefd naar beelden die in werkelijkheid niet kunnen (foto 3).


foto 3: surrealistische fotografie, Copyright http://forum.fnl.nl/showthread.php?t=871, poster Sharili, 13-08-2012


Surrealistische fotografie is een vorm van kunst. Misschien dat de fotograaf echt een reuzenappel met een rits erin heeft en dat hij een koe aan zeven reuzenballonnen heeft gehangen met een zwaailicht voor de veiligheid, maar ik ben er redelijk van overtuigd dat hier beeldbewerking is gebruikt.

Is het een goede foto? Naar mijn mening wel. Is er beeldbewerking gebruikt? Overtuigend ja. Doet het af aan de realteit? Ja. Doet dit alles er toe? Nee. In dit voorbeeld is het naar mijn mening totaal geoorloofd om beeldbewerking te gebruiken. Een andere discussie is of u het mooi vindt. 

Eigenlijk bewerk ik mijn fotos altijd na. Beelden in mijn herinnering zijn vaak veel mooier dan dat ze in werkelijkheid zijn. Ik probeer mijn foto’s ook altijd op een dusdanige manier te bewerken dat ze overeenkomen met mijn eigen herinnering. Ik heb een tweetal fotos voor u geselecteerd die dit visualiseren.


Foto 4: Huis Nijenburg, Heiloo, Copyright photojitsu.nl


In mijn vorige blog schreef ik over de Kattenberg in Heiloo en waarom dit voor mij een speciale plek is. Dit huis (foto 4), huis Nijenburg, staat vlakbij de Kattenberg in hetzelfde Heilooër bos. Huis Nijenburg en de bijbehorende landerijen zijn sinds het midden van de 16e eeuw eigendom geweest van de families Van Egmond van de Nijenburg en Van Foreest. Dit huis had voor mij als kind iets magisch, iets uit een droom. Ik heb op deze foto kleurbewerking toegepast om de herstkleuren de versterken. Daarnaast heb ik de foto in High Dynamic Range geschoten om de lucht en het water in detail op de foto te krijgen. Om de dromerige sfeer te realiseren heb ik het Orton effect toegepast. De foto is al zijn vorm van realisme kwijt, behalve de compositie en onderwerpen, maar komt veel beter overeen met huis Nijenburg in mijn herinnering.


foto 5: Het gevoel van Sinatra, copyright photojitsu.nl


De laatste foto van deze blog entry (foto 5). Ik ben een groot fan van Frank Sinatra. Aangezien ik zijn muziek in de meest authentieke vorm wilde beluisteren heb ik een Dual 1214 platenspeler gekocht en een aantal originele LP’s (niet de moderne 2010 180gr vinyl versies). Als ik Sinatra luister dan hoor ik klasse, verfijning, de romantiek van de rokerige hotels in Las Vegas. Waar mannen in pak en vrouwen in prachtige jurken aan ronde tafels zitten te dineren, terwijl op het podium een big band staat onder leiding van grootheden zoals Count Basie. De platenspeler staat op mijn dressoir, even als de platen. De kleuren van de foto heb ik aangepast naar Sepia om oudheid uit te stralen. De rook heb ik toegevoegd voor de sfeer. Op deze manier voldoet de foto veel beter aan het gevoel dat ik krijg, als ik de muziek van Sinatra beluister.

Zo een heel verhaal. Het gebruik van beeldbewerking gaat gepaard met een hoop mogelijkheden en vormt tegelijkertijd een bron van onzekerheid in de informatie die wij krijgen uit de media. Is beeldbewerking altijd geoorloofd? Naar mijn mening niet, zeker niet als het direct invloed heeft op de relevante realiteit van de kijker. Maar ik denk dat fotobewerking van alle tijden is (ook in de doka gebeurde het) en niet meer weg te denken uit de fotografie. Ikzelf gebruik fotobewerking als middel om mijn fotos beter overeen te laten komen met mijn gevoel en mijn herinneringen in een poging om dit gevoel via een foto over te brengen op de kijker.

Ik dank u wederom voor uw tijd en hoop dat u geinspireerd bent geraakt door deze blog. Tot de volgende keer!


Heeft u vragen, suggesties of opmerkingen? Stuur dan een mail naar info@photojitsu.nl. Benieuwd naar meer van mijn foto’s? Kijk eens op www.facebook.com/photojitsu of www.photojitsu.nl.

Blog 15: The Orton Effect

The Orton effect One of the questions I get asked very often is; how come some of your photographs have such a dreamy look to them? Well...