Blog
4: HDR en selective colour.
So here it is.
My first blog post in English.
I get a lot of
questions about my photographs. The most questions are about my HDR/Selective colour
photos. In this blog post, I will explain how you make them.
HDR
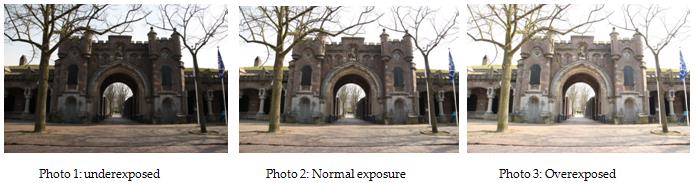
HDR is an abbreviation for High Dynamic Range. It
basically consists of at least three photo’s (five or seven is more common)
that are placed on top of each other. The first photo is underexposed, the
second photo has a normal exposure and the last one is overexposed (photo 1, 2
and 3 respectively).
These three photos are then processed using special
software (Photoshop has a build in HDR script, see the photoshop manual on the
website). The light parts of the photo
are taken from the underexposed photo because they hold the most detail. The
dark parts of the photo (i.e. the shadows) are taken from the overexposed
photo, again because they hold the most details. The rest of the photo is taken
from the normal exposed photo. The result is photo 4.

Photo 4: High
Dynamic Range photo.
Selective colour:
Now that we
have our HDR photo, it is time to add the selective colour. Selective colour is
the term that is used to describe two types of photos. The first is a
photo/film in which only 1 colour is present (remember Schindlers List or more
recently Sin City). It can also be used to describe a photo or a film in which
certain parts are in colour, like in this photograph.
Using
photoshop, we apply a black and white layer to the HDR photo.
Right, lets
have a look at our photoshop screen (photo 5).

Press that
little round icon, and select black and white. Ignore all the sliders that pop up.
Now just go to your brush, make sure the frontcolour
is set to Black and use the brush to “paint” the parts of the photo that you
want to have in colour (photo 6).

This technique
is also more thoroughly described in my photoshop manual that you can find on
the website.
Easy as that! I will close this blog with four
examples of my own HDR/Selective colour photos. Hope you enjoy them!
If you read this blog and/or if you are going to use
my photoshop manual make sure you drop me a line in my guestbook!
Why not join us on Facebook? www.facebook.com/photojistu .


Geen opmerkingen:
Een reactie posten